
Today’s topic, RAW, is another reader inspired subject from Natasha who left a comment on a previous photography post. She said that many photographers are afraid to shoot RAW, which is a mistake, and I absolutely agree. I also know that for many photographers, the concept of shooting RAW is unfamiliar or overwhelming.
I’ll be honest: When I bought my first DSLR four years ago, I had never heard of RAW files and didn’t know the difference between RAW and JPEG files. Even when I did start learning about RAW files, I was hesitant to make the switch from shooting JPEGs. I was brand new to using Photoshop Elements, I had never used Lightroom, and I had no real understanding of the power of shooting RAW. So I kept shooting JPEGs.
Fast forward six months to when I finally bought Lightroom (before the days of Creative Cloud). I shot my first set of RAW images at some friends’ annual lobster boil that week. I was so scared that I’d spend hours working on those files in Lightroom, trying to figure out how to make the most basic edits. But right from the beginning, with minimal knowledge of Lightroom, the program was so easy to use, and I saw SUCH a difference in my photo edits. I’ve never looked back.
If I’d known shooting RAW was so easy (and affordable) and would make such a difference, I would have started shooting RAW as soon as I bought a DSLR. I encourage all DSLR photographers to take the plunge today.
What does “shooting RAW” mean?
A RAW file is the image that the camera’s sensor sees. When you shoot a JPEG, the camera processes the image for you. It makes a lot of the editing decisions for you, giving you less control over the final image. Once the camera has made those editing decisions and finished the JPEG, you can’t recover any detail that gets lost. For example, if the sky gets blown out, those details are lost forever with a JPEG. When you shoot RAW, you’ll be able to recover some of the details in the sky. The same is true for underexposed areas in a photo where the detail is lost in the shadows. Finally, shooting RAW gives you full control over an image’s white balance. Instead of choosing a white balance in camera, you can shoot with any white balance setting and then adjust the final settings in your editing software.
 How do I shoot RAW?
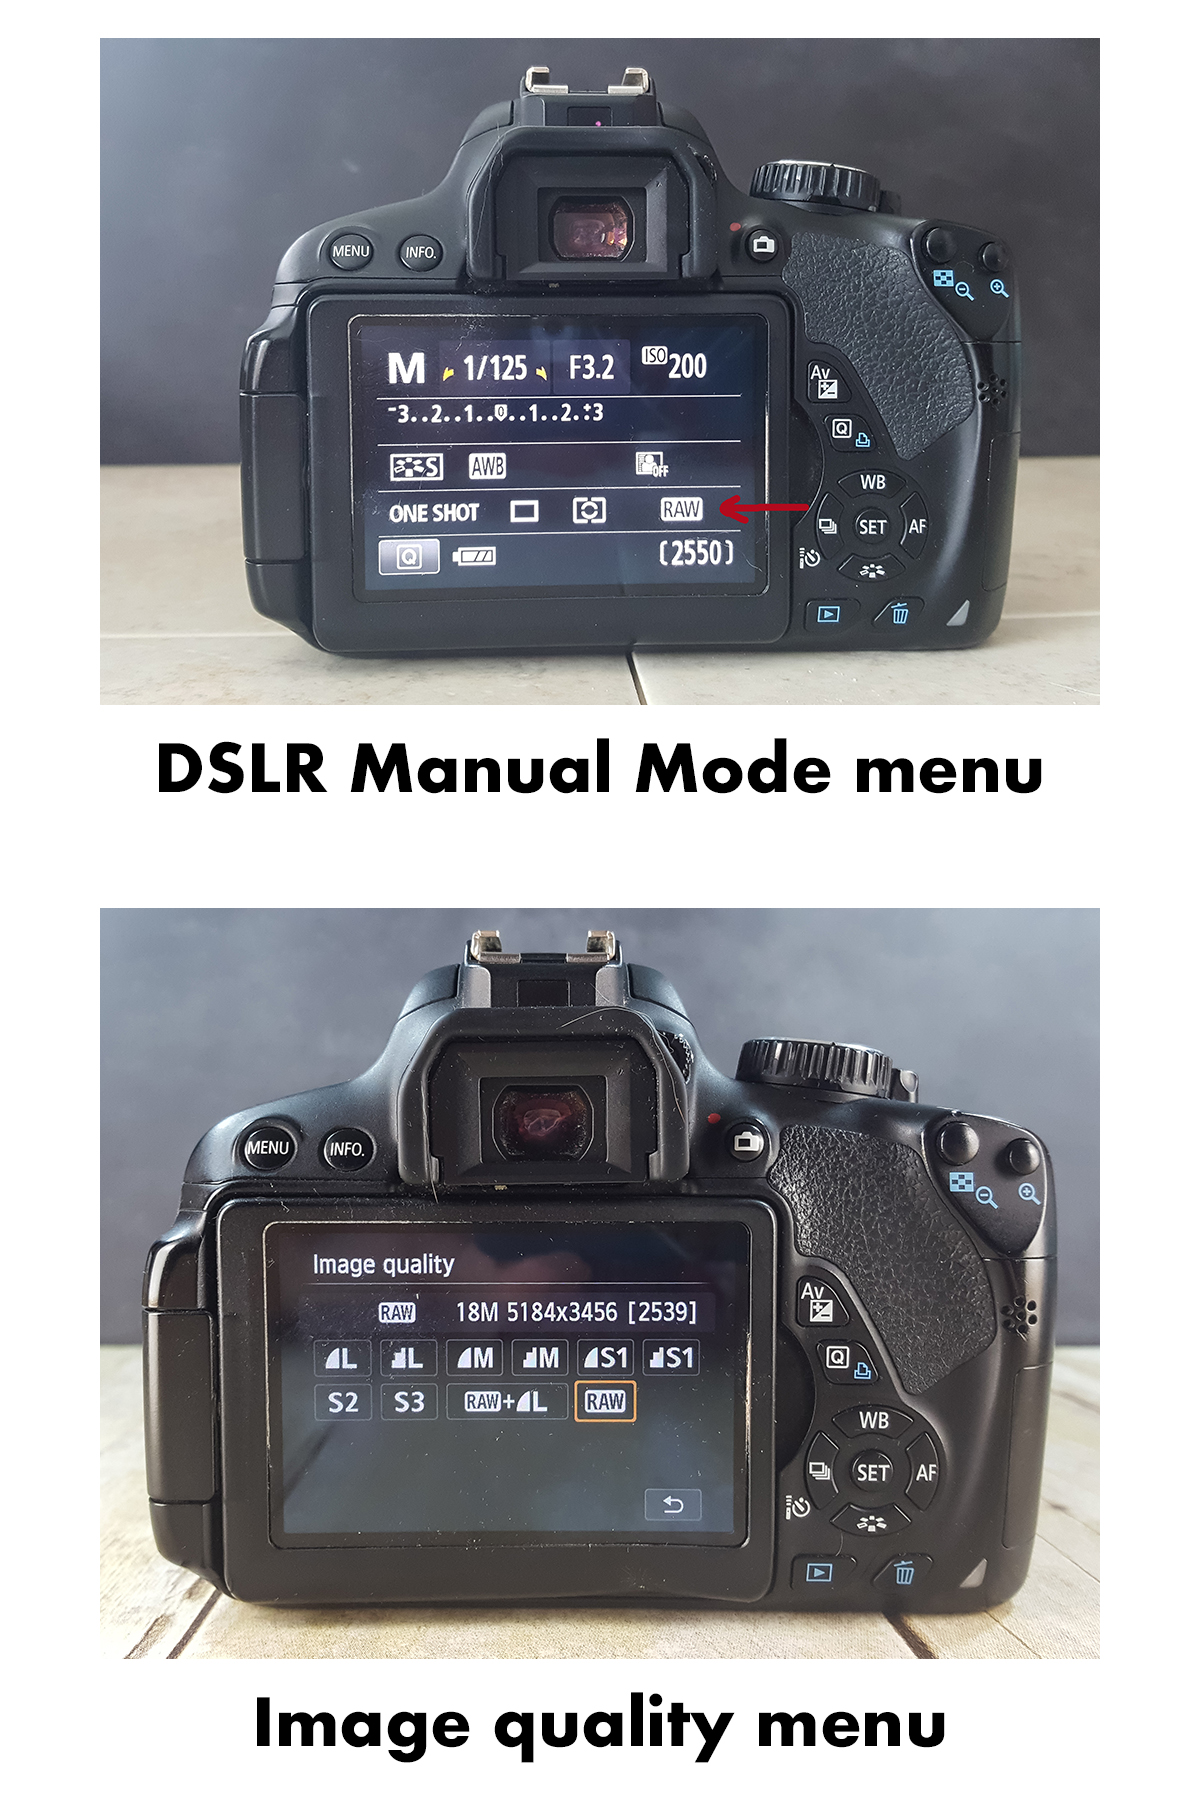
Every DSLR camera has varying JPEG and RAW settings. You can adjust these settings when you’re in Program (P), Aperture Priority (A or Av), Shutter Priority (S or Tv), or Manual (M) mode. The screen shots I’ve used to explain how to set your camera to shoot RAW are from my Canon t4i. These settings may vary slightly for your specific camera model. If you need additional assistance setting your camera to shoot RAW, consult your camera manual.
Personally, I use the RAW only setting. If you want to shoot JPEGs as well to share quickly or to have another backup of your files, choose one of the JPEG + RAW settings.
Uploading and editing RAW files seems like a lot of work. Does it really make a difference?
Uploading and editing RAW files does take more time than uploading and editing JPEG files. However, as you get comfortable uploading and editing files, you’ll be able to streamline your process and get your photos edited quickly. For example, if you do lots of landscape photography, over time, you’ll be able to develop your own landscape photography Lightroom pre-set to use when you import new images. This pre-set does 75% of the editing work for you. From there, you can make final tweaks to your images.
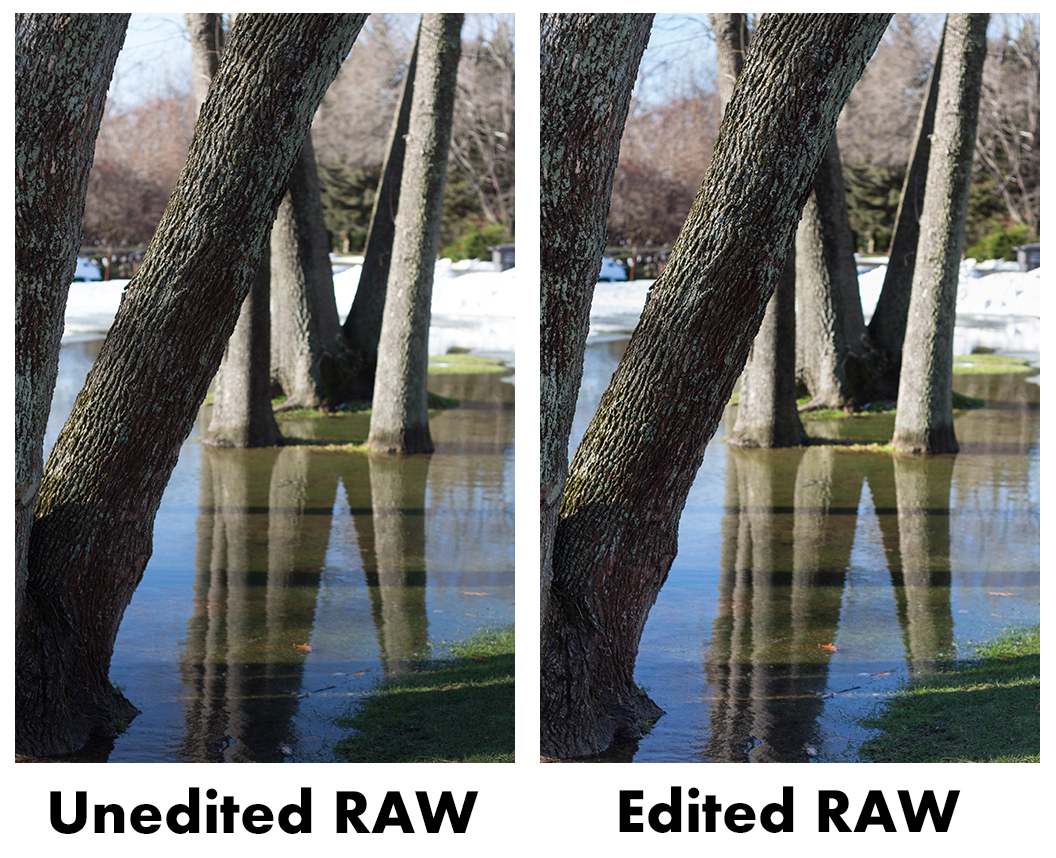
Shooting and editing in RAW does make a big difference. Edited RAW images are higher quality with more detail, richer colors, and more accurate white balance. I shot and edited digital JPEG images for nearly a decade before I switched to shooting RAW. Even without any experience editing in Lightroom, I was able to see a difference in my images right away. If you’ve spent any time shooting JPEG images, which I’m sure you have if you’ve invested in a DSLR, I think you’ll be able to see a difference right away, too. The more experience you have editing RAW files, the more improvement you’ll see in your final images.
But isn’t it difficult and time-consuming to edit RAW files?
Again, initially, editing RAW files isn’t difficult, but it may be a bit time-consuming. Editing RAW files doesn’t mean spending hours and hours editing every single image. Developing and using presets greatly decreases the amount of time you spend on each image. Pay attention to common settings you use, and save these settings as presets. For example, you may develop a preset for your standard blog photography setup or shooting outdoor portraits. Applying a preset, and then tweaking your editing settings slightly is far less time-consuming than editing the entire image from scratch. You may still spend more time than you do on JPEG images, but it will be well worth the effort for the results you achieve.
But isn’t photography software expensive? I like using free photography programs.
Lightroom and Photoshop are professional software programs, which means they do come with a bit of a price tag. But you get what you pay for. Free photography programs, such as Google Photos and Picmonkey, are great for casual photographers who want to make simple edits to photos they’ll share on Facebook and Instagram. They aren’t sufficient for professional photographers and anyone who’s striving to create professional images (i.e. bloggers, portrait photographers, wedding photographers).
Recently, Adobe switched to a cloud subscription model, which means you pay a monthly fee for their software programs. You get all updates as they’re available without having to purchase new versions of software every few years. They offer a free trial for any of their programs. If you’ve never used Lightroom, I highly encourage you to shoot a set of RAW images, download the Lightroom trial, and experiment with editing your images. Adobe also offers pay-by-the-month and annual payment plans. If you aren’t ready to commit to a full year, pay monthly. At $9.99/month, your initial investment is pretty minimal. I know it stinks to have another ongoing fee, but it’s a pretty low one.
But don’t RAW files take up a lot of space?
Yes, RAW files do take up considerably more space than JPEG files. An average smartphone JPEG file is 1-2MB. An average DSLR JPEG file is 5-6MB. An unedited RAW file is 18-20MB or more. The finished RAW images you export as JPEGs are also bigger than their regular JPEG counterparts. But memory space is incredibly cheap. Once you’ve invested in external storage space, you’ll be able to use it indefinitely. Currently, I have a 1TB hard drive and a 1TB external hard drive. I’ve had no problem storing all of my “in progress” RAW files and finished JPEG images on these drives.
If you’re in the market for a new computer, don’t consider anything with less than 1TB hard drive space. If you’re short on space or need a backup source, pick up an external hard drive. You can get all the RAW storage space you’ll ever need for $200 or less. I’ve been using a Western Digital brand drive for the last few years and have been very happy with it. Seagate Expansion is another fantastic option. Choosing a well-known, reliable external storage drive company ensures consistent results to keep your valuable image files safe.
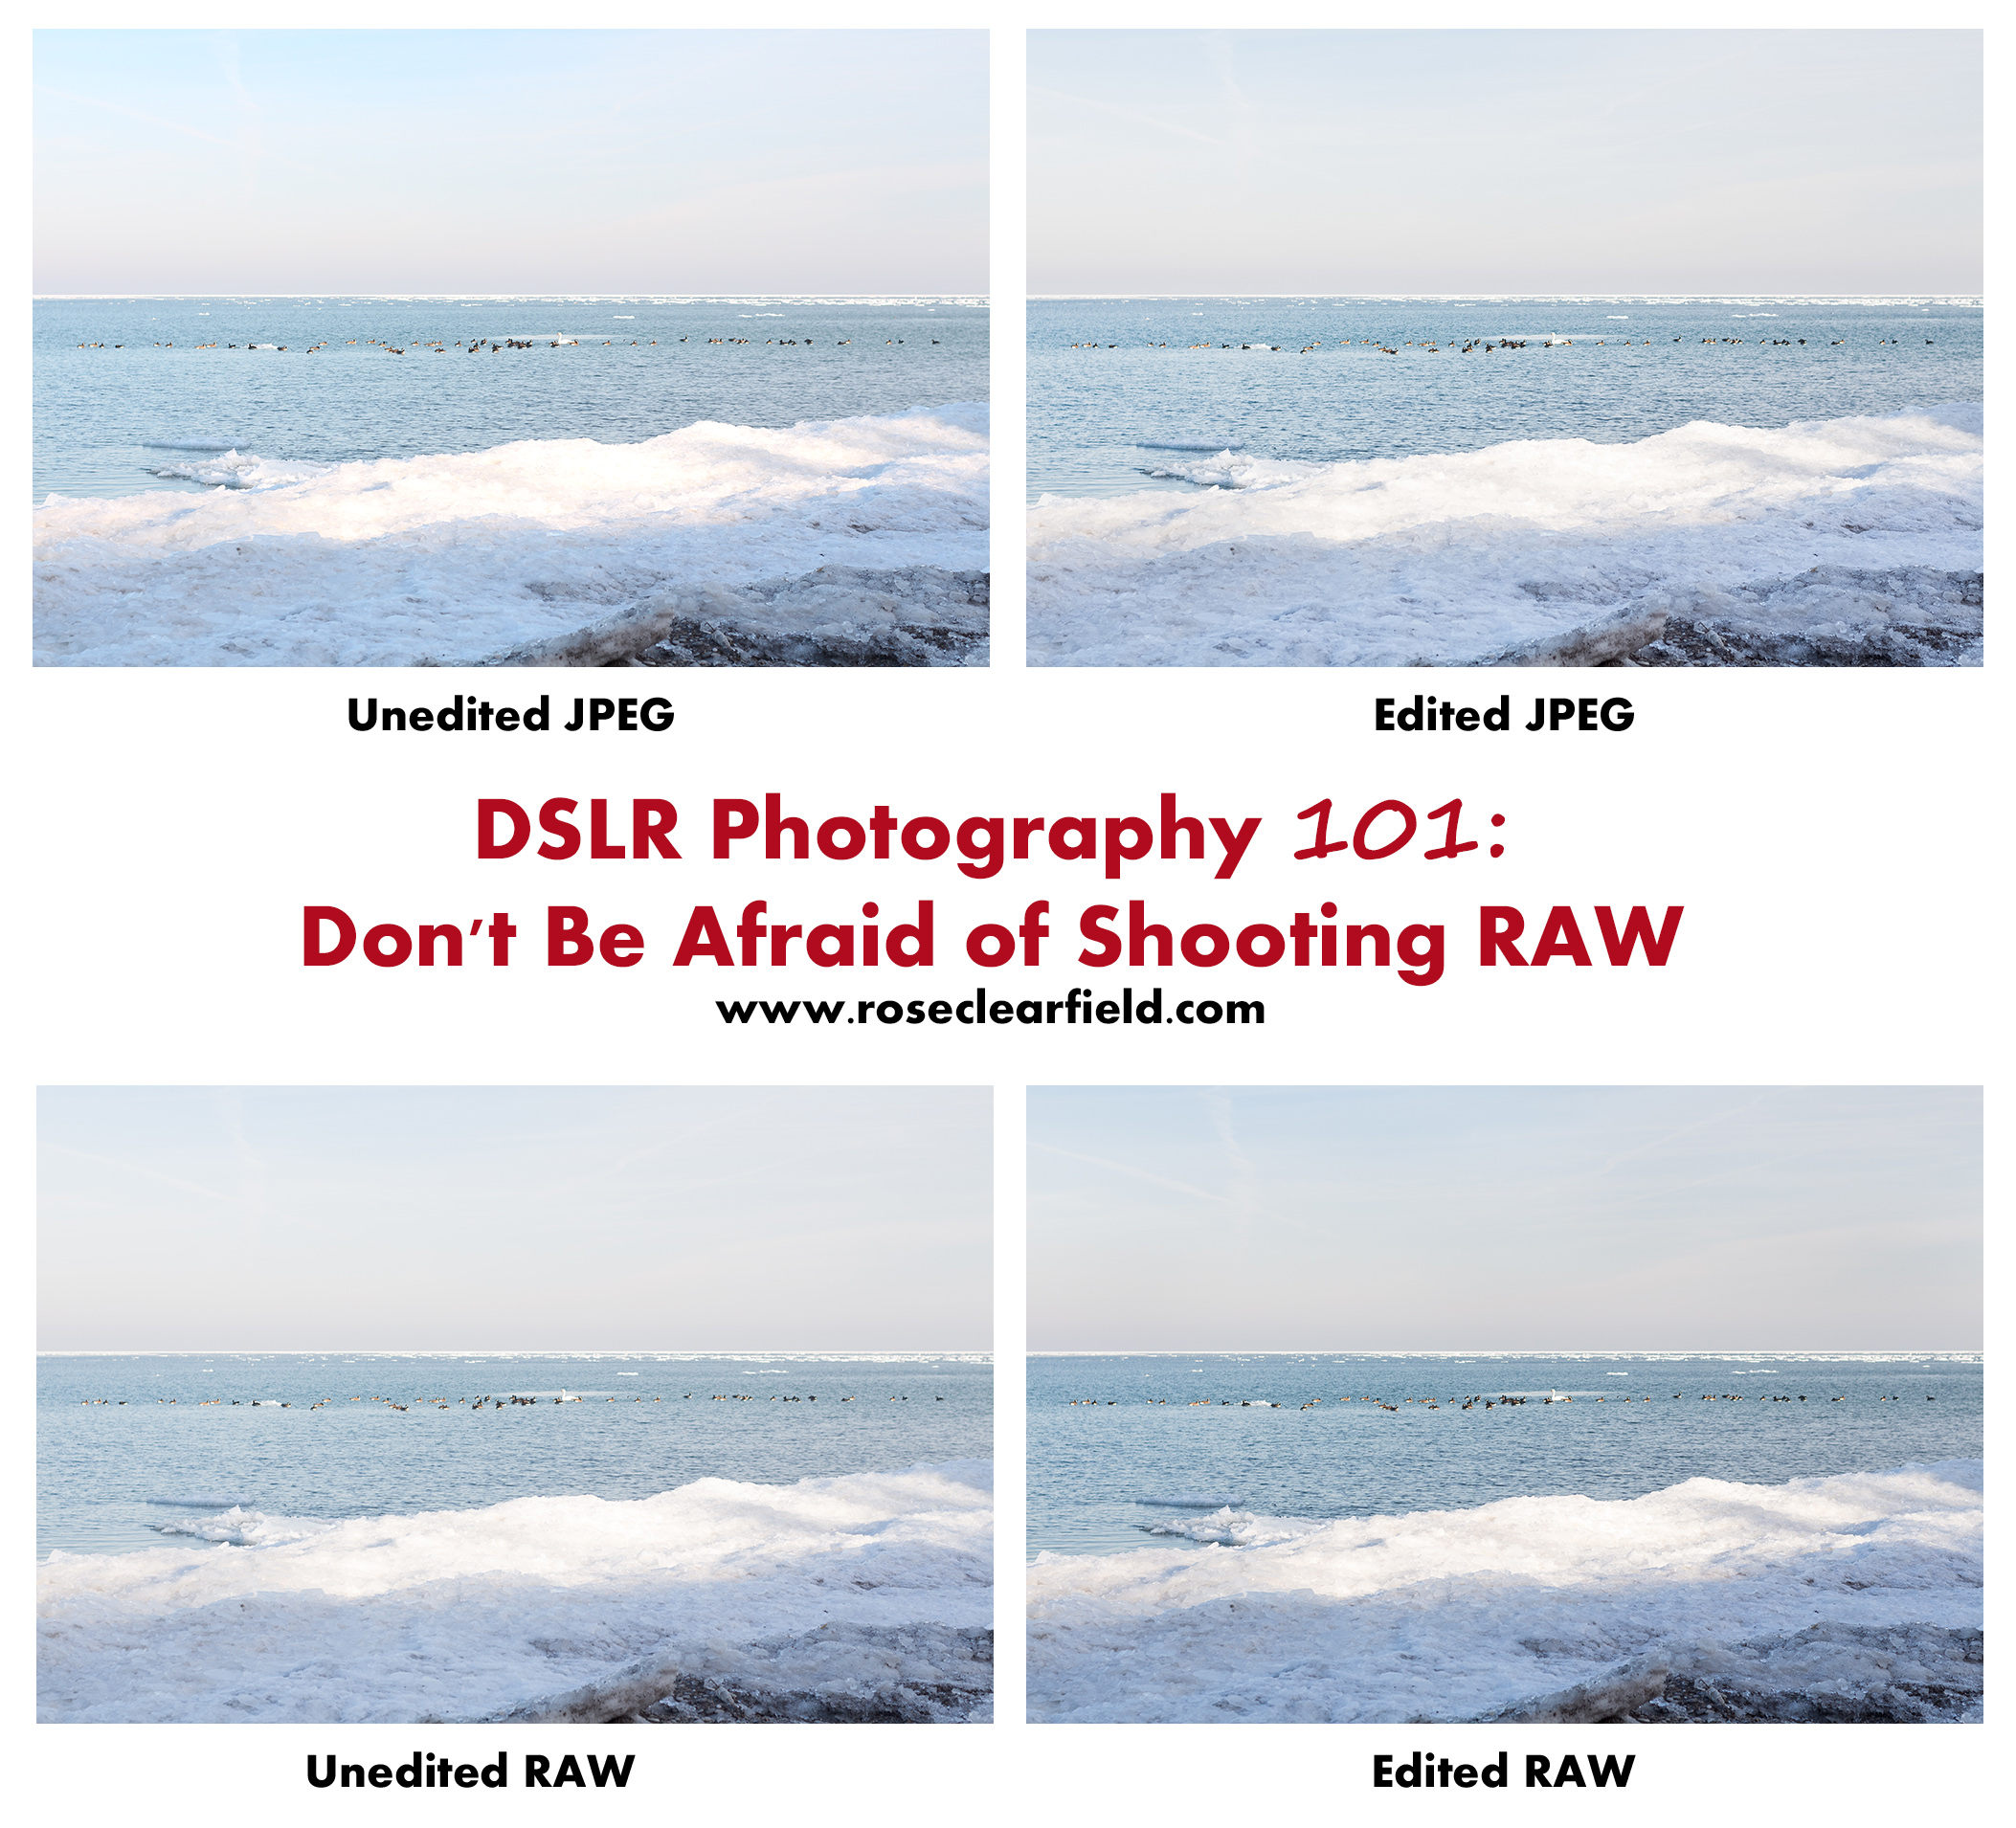
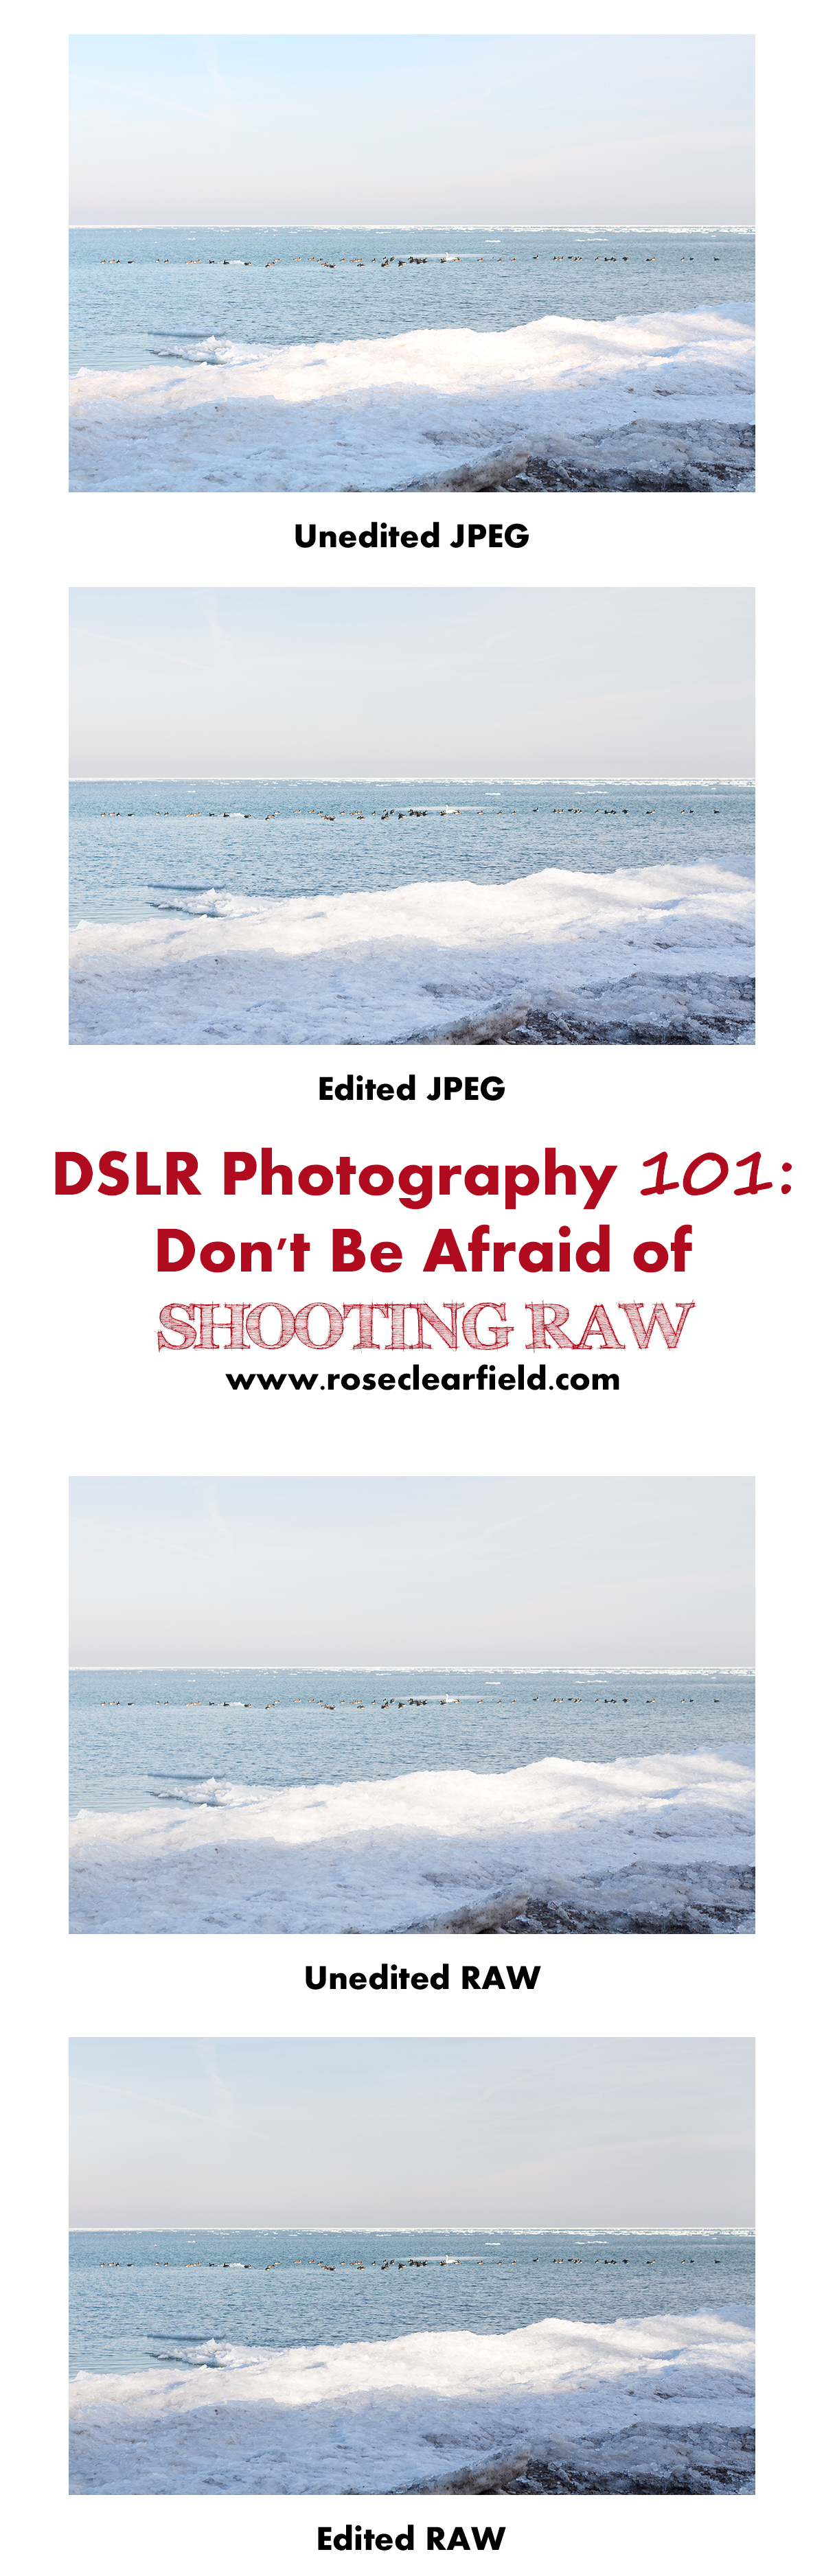
Finally, I’m going to take you through JPEG and RAW examples of a single image. You have to try shooting and editing in RAW to appreciate the difference between JPEG and RAW fully. But I hope these examples assist you in your decision to take the plunge and shoot RAW.

This is the JPEG version, straight out of the camera. It’s okay but not amazing. The sky is pretty light, a portion of the ice and the swan are completely blown out, and the front portion of the ice is way too shadowed.
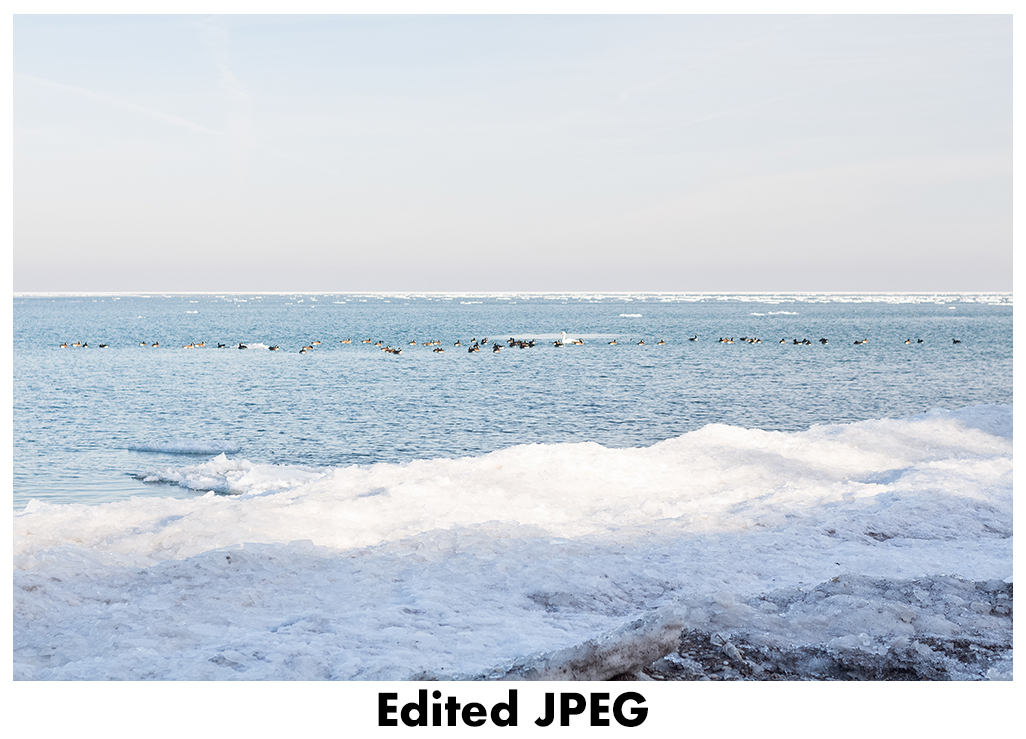
This is the JPEG, now edited with Lightroom. The edits don’t make much of a difference. There is a little more detail in the water, and I was able to bring up some of the shadowed ice. Otherwise, the image is virtually unchanged.
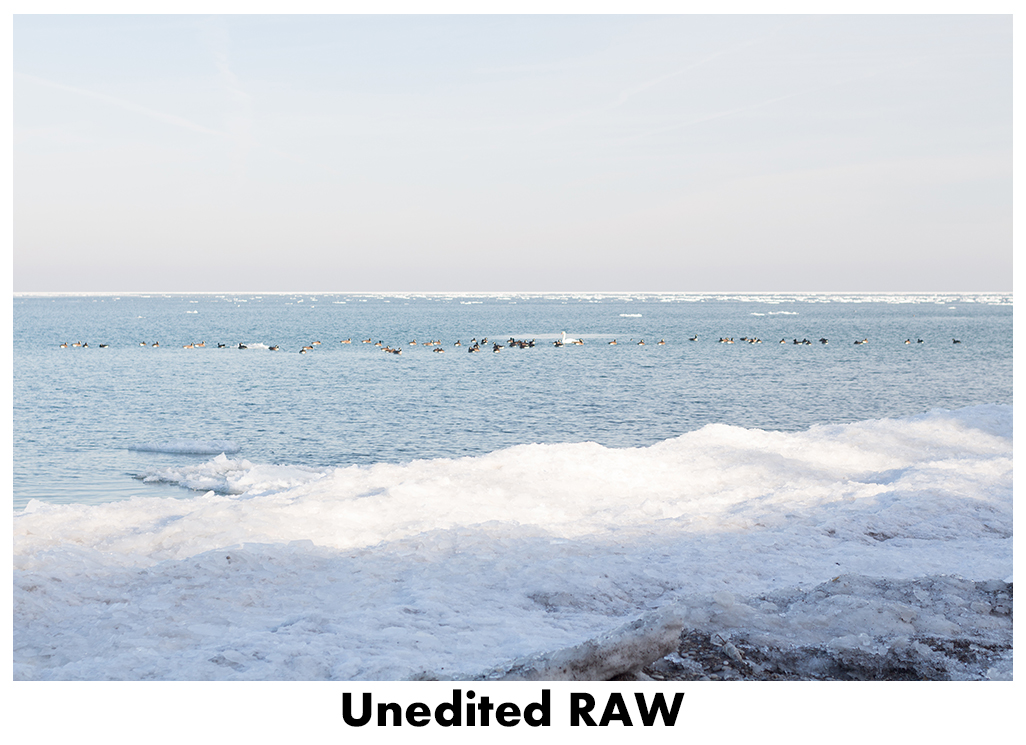
This is the RAW version, straight out of the camera. Unedited RAW files are always a bit underwhelming. Initially, it may be discouraging to see images that actually look worse. However, you’ll quickly realize how much more freedom you have to edit the image, ultimately creating a more detailed image with richer colors and more accurate white balance.
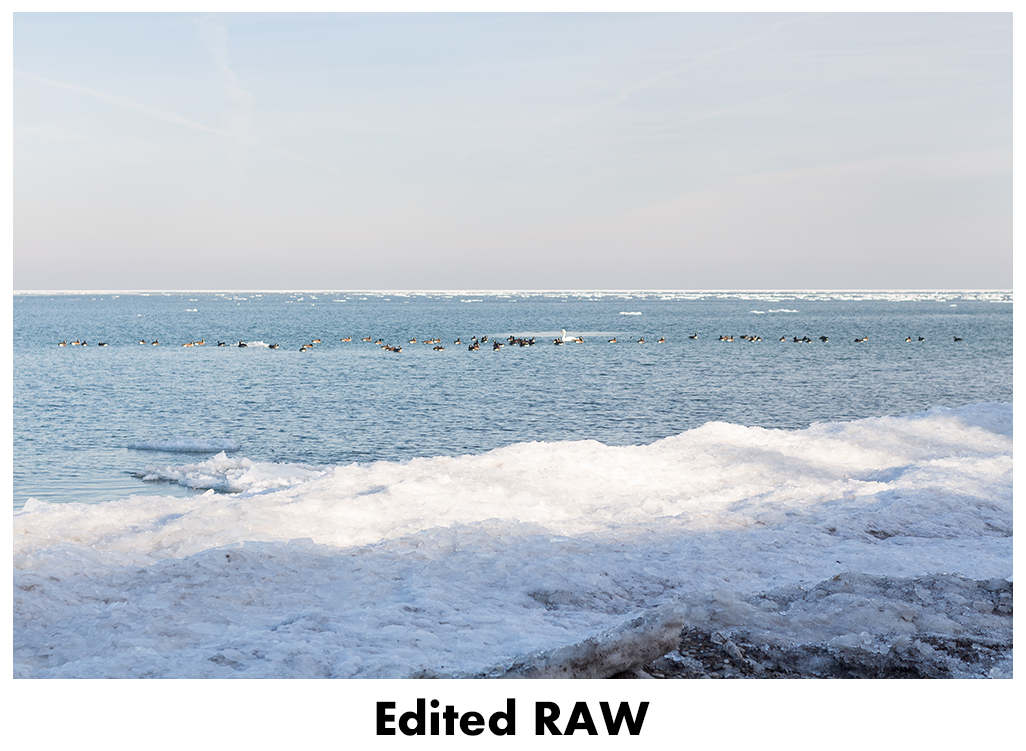
This is the RAW version, now edited with Lightroom. The edits I made to the JPEG and RAW versions are extremely similar. It’s not hard to see that this is the clear winner among the four images. The sky and water have detailed, rich, accurate colors; the swan and ice aren’t blown out; and the shadowed ice has been brought up so there’s more detail without losing the natural shadowing effect completely.
[Disclaimer: This post contains a few affiliate links. Thanks for your support!]
More photography posts!
Photography 101: Never Stop Learning

Top 10 Common Photography Mistakes to Avoid

Why I Don’t Watermark My Photos
Do you have any other tips or insight about shooting RAW?
Leave your thoughts in the comments!
